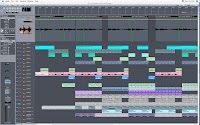
 The new album continues to come along! So far, I’ve completed rough Pro Tools edits on seven of the twelve songs we tracked at Dark Horse Recording in Nashville on June 18th. Editing is definitely not the flashiest part of the production process, but it is crucial. In this blog, I will try to de-mystify this important stage.
Slicing and Splicing
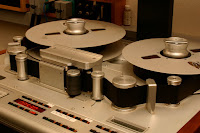
Years ago in the days of reel-to-reel recording, audio editing was accomplished with a razor blade. If an audio technician wanted to make an edit in a recording, he/she would literally cut the tape where desired and re-attach the tape with an adhesive (usually tape). Now a days, editing has become much more easy and precise with the release of digital audio systems (the software Pro Tools being the most widely used). Today, audio can be sliced into pieces and re-positioned with a few simple clicks of the mouse – no razor or tape necessary.
Editing Basics
As I mentioned in the previous blog, I prefer to edit in layers (at least when numerous live tracks have been recorded). The first layer of editing involves two elements: (1) replacing wrong notes by cutting right notes from another take or another portion of the song and replacing the wrong notes with the right notes, and (2) swapping out any bass/guitar notes, drums fills, etc. which I deem as misplaced or inappropriate to a given song (this is pretty rare given the players at the June 18th Nashville session).
When opening the Pro Tools session of a song, I begin by setting up a rough mix so I can hear all the instruments. I start by turning down all the audio channels and then I carefully bring up the drum mics, starting with the overhead mics, followed by the kick drum mics, and then the snare drums mics (in addition, I'll mix in some tom mics and room mics here and there). I also bus all the drum channels to a single stereo audio track so that I can control the overall drum mix with a single fader. I then slowly bring up the bass and guitar channels until they are well balanced with the drums.
After I have a rough mix, I solo out the drums and listen to them very carefully from start to finish to make sure there are no questionable hits or fills. I will also re-adjust any edits that were made the day of recording. During the recording session in Nashville, we would sometimes re-record a portion of the song – this is otherwise known as a “punch-in.” For example, if we had re-recorded the first chorus of a song, I will listen carefully to the start and end of the first chorus to make sure the edits both at the beginning and at the end of the chorus are clean (no clicks or pops) and natural (undetectable by the listener). Usually a punch-in begins a measure or two before and lasts a measure or two after the section that is being re-recorded. This allows for some “handles,” allowing the editor to re-align the actual place of the edit if necessary. For example, I may find that the first edit sounds awkward if it happens right before the downbeat of the first chorus. I may instead re-position the edit to beat four immediately before the downbeat of the chorus. It all depends on the section being edited. Every edit is going to be different.
In most cases, I will add a cross-fade everywhere where there is an edit. A cross-fade connects two adjacent audio files by overlapping them with a quick fade out and quick fade in. Cross-fades help to eliminate any pops or clicks, and aid in smoothing out an otherwise abrupt edit.
The Second Layer of Editing
During the first stage/layer of editing, I do most of my editing manually. By this, I mean I cut and move audio around by ear. I am always working on a visual grid which can be set anywhere from whole notes to 1/64th notes and beyond. This visual grid can be helpful when I am trying to figure out why an instrument sounds ahead or behind the beat. I may also synchronize instruments by visually lining them up next to each (as I can see the actual audio waveforms). An example of this would be two unison acoustic guitar takes - one panned to left and one to right.
During the second stage/layer of editing, I use a software tool called Beat Detective that allows me to quickly tighten things up by a percentage. For example, I may edit the drums to 92% instead of 100% (which might happen if I manually lined up every drum hit to a 16th note grid). It’s a pretty amazing technology. Within minutes, the program can (1) find all the drum hits (2) slice the drum audio at every drum hit (3) align the drums to a grid by percentage, (4) fill any gaps caused by the moved audio, and (5) add cross-fades where necessary. This is much easier understood if you actually see the program at work. I may post a video tutorial one of these days.
As far as editing order, I usually begin by doing some moderate Beat Detective editing on the drums and then I re-adjust the bass and guitar as necessary. I also always keep a backup of the original unedited audio in case my edits end up hurting the groove of the song.
A Delicate Cascade
Editing is both miraculous and dangerous. You can save a song with editing, but you can also destroy it. It’s important to understand that an edit made to one instrument can greatly affect the feel of the other instruments in a song, and can quickly upset the rhythmic equilibrium. No edit is an island. Moving the bass can mess up the groove of the drums and guitars, and locking the high hat to a 16th note grid can make the drums sound robotic (which may be intentional, depending on the style and song).
Some styles such as dance music imply a robotic feel, but most rock music calls for a human touch with some moderate rhythm inconsistency. Even the most accomplished musicians can’t play with the precision of a drum machine, but this rhythmic “imperfection” is one key ingredient to making music sound alive.
So why edit? Well, editing becomes a necessary evil especially when a musician is combining live and programmed elements (which much of my music incorporates). Live drums have to be a lot tighter than usual if they are being played along side programmed drum loops and synthesizers. At the end of the day, it’s really a matter of taste, and I prefer my music to be tight, but not mechanical.
Most of the songs you hear on the radio these days have undergone significant clean up and editing. The real test always becomes whether a band/musician can reproduce this sound from stage (although the stage is much more forgiving than recorded media).
Pictured is a classic 2" tape machine. These machines still record great audio, but make editing very difficult. Some musicians will actually record to tape and then transfer the tape audio into Pro Tools where they can more easily tweak and edit the audio.


